Showing posts with label Finished Projects. Show all posts

Saturday, July 5, 2014

So, I Broke Down and Made an Archer

The day before my birthday this May, my husband and I took a day trip to Olney, IL.  Now, Olney's claim to fame is their colony of white squirrels. It's been on my list of places to visit for years now.  And, I was determined to finish and wear my new Archer shirt for the trip, a project that I began last fall.


I never considered myself a fan of button up shirts.  I think it's because they represent a combination of Catholic school repression (part of the uniform) or they're part of the dress code if I have to attend a trade show for work. I've admired them on other people but not something I would often choose to wear.

Enter the BeachComber reversible cotton gauze from Vogue Fabrics.  I saw this fabric last year during a Chicago blogger meetup.  I gazed at it and debated for a long time before not purchasing any. To me, it screamed to be made into a button up shirt - not my style

About two weeks later I decided I couldn't live without it and went back for some (which it totally my style!)

I sat on it for a while longer before deciding sometime last fall that I would succumb to the Archer pattern from Grainline Studio. I've seen so many cute versions out there and wanted to try it out. I was going to try to make a reversible shirt and use the smaller checks on the outside.

My original plan. This is also the best representation of the shirt's colors.

This took a while to make, through no fault of the pattern. I just hit a wall halfway through.  The side I was using just looked too "90s" to me and it was driving me nuts! I just didn't like it. I put it away for a while before deciding just to flip it and live with the fact that my buttons would be on the wrong side.

That made all the difference in the world!

Archer Shirt

I do have to say that for my first successful button up shirt project (there have been a few starts in the past, but nothing that ever made it to the buttonhole stage) - this fabric was a bitch to work with! It's a very loose weave and frays like crazy.  I'm lucky that I accidentally sewed the back pleat wrong to begin with, so it's perfect now. I was also attempting flat felled seams (or at least my version of them), but because there's so much fraying I had to go back over and hand reinforce them. Still, it doesn't really bother me and I don't think it's noticeable.
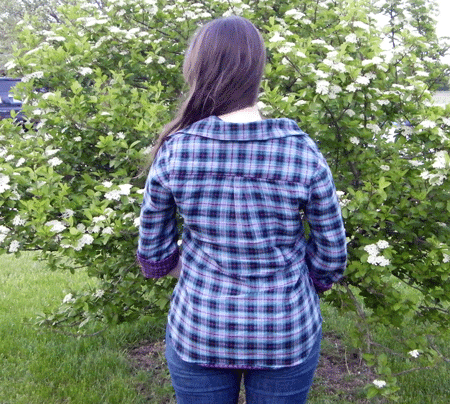

I cut a 6 at the top and graded to an 8 at the waist. Problems aside, I love it.  Sure, it could probably use a sway back adjustment (next time-and there will be a next time), the button band isn't perfect because it's technically the inside (but the print hides it, so who cares! And, the inside does look amazing.)


As for the Olney trip, we must of come at the wrong time, because we only saw one of the little guys! Still, it was worth it :)


Tuesday, November 5, 2013

Kimono Tee Time (Part II)

I've been meaning to post this project for a while now. Funny thing... I had the bright idea to make my friends matching Avocado hoodies for their upcoming wedding. Mind you, this was about a week and a half before the wedding. Brilliant, I know. I printed patterns and purchased fabric but wasn't able to start until last Monday. The wedding was on Friday. I managed to bust out both hoodies in 4 days!  Damn that was crazy, but so happy I finished in time. Of course I don't have pictures, but maybe I'll be able to take some soon.

So, it's because of that small little side project that I haven't had a chance to write up a proper post until now for part two of my kimono top binge, the Burda Kimono Top:


Before my official "I'm expanding my horizons and making something that's not a Renfrew" experiment [link], this was probably the only other top pattern that I've made in the past year or so.

Pattern:  Burda 7866

Fabric:  If you guess Vogue Fabric remnant room, you'd be correct! This is a very pretty, soft wine-colored knit. It's dressier than the t-shirt fabrics I normally pick up.

Size and Modifications:  I cut a straight size 10. I've had this pattern cut out for a few years now, and I probably should go up a size, at least in the hips.  Some day...  I also left out the belt because I would just lose it anyway.

I promised my photographer extraordinaire, my husband, that I would include this action shot (even though I look like I'm missing an arm):


And the back:


It's really a simple, versatile pattern. Not too many bells and whistles, but a nice basic top that I know will end up in heavy rotation.

Tuesday, October 29, 2013

Kimono Tee Time (Part I)

Once I latch on to something, it's can be hard for me to try something new. I'm like that with many things - food, TV shows, music, etc. For sewing, after I've found a pattern that I like and that fits well, I tend not to stray. Especially if I've spent some time making adjustments.

That said, I'm trying to expand my horizons. It all started with this awesome fabric that I picked up from Mood online:


It was screaming to be made into something other than a Renfrew, my go-to top pattern. Something boxier that would highlight the fabric more instead of a body-hugging style.

Enter the Kirsten Kimono Tee from MariaDenmark. This is a free pattern available when you sign up for the MariaDenmark newsletter. I was actually eying up another top pattern on the site but was really drawn to this. If you asked me a year ago if I would ever make a top this style, I would have said "no". (Why? I don't know. That's just how I am.) And, I would have missed out on this:


Pattern: MariaDenmark Kirsten Kimono Tee

Fabric: The description on the Mood website is Navy/Black Misc Novelty Knit, and it's a polyester rayon blend.

Size and Modifications: I cut out a straight BL (for this pattern, that corresponds to body measurements 38.5" bust, 32" waist and 42" hip). I wanted something slightly boxy and originally tried to grade the pattern between sizes. (The only measurement above that matches me is the hip.) However, after multiple attempts to grade between a small and large and add seam allowances, I gave up.  This was totally no fault of the pattern, I just spaced out multiple times during the process. Funny thing is that I'm completely happy with the fit of the current size and could have saved myself a headache in the first place.


Once I assembled and finally cut the correct size pattern out, the shirt went together quickly. You sew the side seams, attach a neck band, hem the cuffs and bottom and boom you're done! It's simple, yet elegant.


The black mesh of the fabric is see-through and I do have a tank top underneath because this is not that type of blog!  :)

Monday, October 21, 2013

Purple Explosion

I've been on a top-making binge lately.  Between last Wednesday and today, I've made three tops and am half-way through a fourth.

The one I'm most excited about is my second Avocado Hoodie made from the awesome heathered purple fleece I picked up from my recent trip to the Textile Discount Outlet (Blogged here. I called it maroon in that post, but after playing with it for a while, have decided it's more purple.)

Avocado Hoodie

Pattern: Avocado Hoodie by Disparate Disciplines. I made option B, non-overlapping hood with back pockets.

Fabric: Super soft, super awesome purple fleece from the Textile Discount Outlet. I could not stop petting this in the store. I also used purple jersey left over from this dress for the pocket lining picked up in the Vogue Fabrics remnant room.

Avocado Hoodie

Size and Modifications: Even though I said I would modify the size a bit after my last hoodie, I lied.  I used the same sizing as before - size 6 on top and size 8 at hips. Since this fabric is much thinner and more drapey than my first, it fits looser.

Avocado Hoodie

I also did elect to interface the pocket tabs with some lightweight fusible interfacing and tacked down the tabs just a bit in the corners. This helped them not gape open as much as my first hoodie. (That one isn't bad, these just lie flatter.)

Close-up of my lining:


Underneath , I had on my latest Renfrew.  This is the millionth time I've made this pattern, and there's no end in sight. This shirt was made from purple burn out jersey picked up from, you guessed it, the Vogue remnant room. Seriously, most of my Renfrew fabric comes from here.


As you can probably tell, I've been on a major purple/maroon/burgundy/wine colored fabric binge lately. But hey, if the color works, why not stick with it?

Sunday, October 13, 2013

Completed Silk Saltspring!

Well, the monkey is finally off my back (or baboon off my ass, if you remember my earlier post). I finished my silk Saltspring!


This one nearly did me in! After my first attempt (see link above) I spent a lot of quality time, just me and my seam ripper, completely taking the skirt and lining apart. I spent hours more trying to figure out exactly the best way to re-cut the skirt to avoid unfortunate pattern placement and also work with the fabric that I had.


Pattern: Saltspring from Sewaholic

Fabric: Thakoon paisley silk crepe de chine from Mood Fabrics and black Ambiance Rayon Bemberg lining from Vogue Fabrics.

Construction Techniques and Modifications: I cut a 4 at top graded to 8 at the waist. I swapped the ties for thicker straps and added a skirt lining. I used French seams for the outer fabric and lining, and used strips of the lining selvage to stabilize my zipper edges.  For the zipper, I used the Sewaholic tutorial for covering the zipper end (I love this little detail):


For the skirt, my goal was to create a wall of design noise instead of having a focal point with a perfectly centered pattern (if that makes sense).  To do that, I cut the fabric on the bias(ish), taking care to make sure the pattern motifs were away from the danger zones (In addition to the unfortunate back pattern placement, my first version had one area that looked very much like a diagram of a uterus centered directly front and center. I've managed to avoid that this time around.)  I also didn't worry about pattern matching on the skirt.

One source of inspiration was this dress below. I also saw on other Thakoon outfits using the same fabric that weren't always centered or cut on grain. (Some were, some weren't.) Every time, it just magically worked and I am in awe of his pattern placement genius.

Inspiration for re-cut skirt. Source: http://www.lyst.com/clothing/thakoon-paisley-tank-dress-multicolor-1/


Is it perfect? I don't think anything ever is. And, I've been staring at this for so long it's hard to be impartial. But am I happy? Yes. I'm sure this isn't everyone's cup of tea, but I do like the crazy bold pattern.


This project has taught me not to be afraid of working with expensive, special fabric. Fabric that I put up on a pedestal. The worst thing is that I might mess up. Well, I did that. I spent a lot of time trying to correct it, and in the end I created a dress that I would wear.  Boom. Done. Next project.

I have a ton of scraps of this print left! Not enough for a whole new dress, but enough for a lot of small projects. I wouldn't be surprised if I can manage a scarf, top and a whole lot of fancy bias tape out of this.

Now, I can get to all of the other projects I have lined up. I've been very good, forcing myself to not start them until I completed this (the Avocado Hoodie doesn't count because Saltspring and I really needed some time apart.)

Sunday, September 29, 2013

My First Avocado Hoodie

 My first Avocado Hoodie:


I'm calling this my "first" because there's definitely going to be more!


Seriously, I love this!

Pattern: Avocado Hoodie by the amazingly talented Mari of Disparate Disciplines.  I choose Option B, non-overlapping hood with back pockets.

Fabric: Double-sided sweatshirt fleece from Vogue Fabrics in Evanston. It's chocolate brown on the outside and a lighter tan on the inside. I used green jersey left over from my Burda gathered top for the pocket lining.

Size and Modifications: I cut out a 6 at the top and graded to an 8. The only other intentional modification was that instead of using clear elastic to stabilize the bottom pocket edge, I used a strip of the fleece selvage. Time will tell how well this holds up.

By "intentional" modifications, I kind of made a few mistakes along the way with construction. The instructions are great, but I just spaced out from time to time and forgot to follow them in a few places. It's all on me. Most of the time, it just meant me spending some quality time with my seam ripper (we've been very close the past few weeks), but I will need to go back in an either redo the topstitching along the neck or tack down the facing. I was in the home stretch and didn't see that I was supposed to sew 3/4" from the neckline. I think mine is about 1/4".  It just means the facing sticks up a bit, but I'll probably go in and correct this soon.

Check out the back pockets!


I do have just a bit of bunching around my hips and lower back. The instructions do suggest using a fabric with 4-way stretch if you have a swayback or a proportionally larger bottom (Check and Check). They also suggest making sure you have positive ease. I haven't measured, but with jeans on I should be right at the finished garment hip measurements. None of this bugs me in the slightest because I think it still rocks and is super comfy, but I will probably grade my next one a bit larger at the hips, or pick a lighter weight fabric.

And can we talk about the thumb holes!


I'm thinking of stealing this pattern piece and adding it to other tops because I really do love this.

The best news, my husband wants his own hoodie! There are a few (hundred) projects ahead in line, and I'd have to figure a way to grade the men's pattern up for him because he has crazy huge shoulders, but it should be fun!

I'm just sad that the weather is so nice out, because I really want to wear this more (or at least for longer than this photo shoot)! This is some seriously warm fleece, and I'm pretty sure I'd die if I wore it outside this coming week.

Thursday, September 5, 2013

Finished Floral Saltspring

Here it is, my completed first Saltspring dress. I love everything about this!

Floral Saltspring Dress

Technically this is my "wearable muslin", so that I can perfect the fit before cutting into my Thakoon silk

Floral Saltspring Dress

Pattern: Saltspring Dress from Sewaholic.

Fabric: The fabric is from an extra large rayon dress that I picked up for a couple of bucks at my local Village Discount Thrift store.  It's 100% rayon, and so soft! I was in a "I want Hawaiian inspired fabric" mood when scoping the place out that day, and this fit the bill perfectly.

I also used a light pink cotton batiste (not pictured) left over from other projects for the pockets and bodice lining.

Before and After

Size and Modifications:  I cut a 4 for the top and graded to an 8 at the hips. I normally also do a swayback adjustment, but chose not this time. I figured that blousing effect would negate the need to make this adjustment. Looking at the pictures, I'm not sure. I think the dress still looks great, and am not sure if the lack of adjustment is noticeable to anyone but me, but I still might make the swayback for my silk version.

Floral Saltspring Dress

I did not have enough fabric to cut the flared skirt and had to adjust it to a dirndl skirt. It's not absolutely ideal, but also probably not that noticeable and I have to work with what I have. Also, for the purposes of this "muslin", was more important for me to test out the fit on top.

I did not have enough dress fabric to cut the lining pieces, and used some leftover pink cotton batiste from my stash.

For the ties, the original dress had waist ties, which I repurposed as is for the back ties. I did cut and sew new front ones. For my next version, I might shorten them a bit, or go with one of the many strap variations I've seen floating around the blogosphere.

Final Verdict: Love, Love, LOVE this! Still going back and forth over potential adjustments, but nothing that makes me like my first version any less.


The location for these photos was Gallery Park in Glenview, IL.  I call it Cormorant Park.  Here's why:

Double-crested Cormorants. Love them! (I'm kind of a bird nerd.)

Okay, deep breaths.. it's time to cut into my silk now.  Wish me luck!

Monday, September 2, 2013

Woo Hoo...I'm Back!

I'm back!  Wow, it's been a while. So much craziness has happened since my last post!  I've endured the move from hell, had a virus knock me out of commission for a few weeks and dealt with pet drama.  I also haven't been able to reach my sewing machine since the move until recently! So many boxes.

Someone's getting settled in at our new diggs. It's temporary, but don't tell her that.

While I haven't been sewing for over a month, I've been lurking on everyone's blog and living vicariously through the sewing projects of others. Thank you all! If I can't sew, at least I can admire those who can.

I've also been acquiring fabric. My hording abilities haven't been hurt by any of the above! It's quite therapeutic really, and I've picked up some awesome stuff that I can't wait to show everyone!

Last week I finally felt well enough, and was finally able to clear up enough space to sew again! It felt so "right"!

My project was McCalls M6744.  Full disclosure: I was heavily inspired/blatantly stole this idea from Gail's blog.  I love her version, and came across it when I was looking for a perfect summer dress.  I wanted something simple, lightweight and fuss free.  Something that I could make 10 of and just throw on in the summer.

McCalls M6744

Pattern: McCalls M6744, View A.

Size and Modifications: I cut a Small at the top and graded to a Medium at the waist.  The only other mod was to shorten the strap. I didn't realize it needed to be shorter until I had finished the neck and armholes. No matter, I folded the strap older and top stitched. It's not perfect, but I'm the only one who will notice. I'll need to shorten it further for my next version.

Fabric: Jersey from my favorite jersey source - the Vogue Fabrics remnant pile!

McCalls M6744 Dress

Final Verdict: I really like this. The elastic waist is actually my favorite detail. So simple, but I just think the casing looks great!  I made a minor error on the casing. When I finally figure out the instructions, I was half way through my own method. It's not bad, just a bit different.

Funny thing, shortly after I started this (I actually started before the move), I discovered Sewaholic's Saltspring dress.  Both have the shape I wanted (blousy top and flowing, loose skirt). Saltspring is next up in my queue, so we'll see what happens.

Sunday, July 14, 2013

White Eyelet Hazel

In case you haven't noticed, things have been pretty slow around Chez Makizy.  We're currently packing up and moving to temporary digs at the end of the month, which unfortunately doesn't leave me with too much quality sewing time. Oh well, it's just a step toward our dream of owning our own house and me having my own sewing room! Things should pick back up in August.

Ms Macy is always ready to take time off from packing and supervise whatever sewing takes place.

The other good news, my laptop is finally back up an running. I have a sweet new hard drive and reinstalled Adobe, so I'm ready to blog!

This poor Hazel has been in a state of being almost done for about 2 weeks now. I finally finished yesterday:

White Eyelet Hazel Dress

I have to say that I had the hardest time photographing this dress! There is nothing clean in my apartment at the moment because of my packing. Also my back porch, where I've been taking most of my pictures lately, is being painted and off limits.  This was my best picture, taken before the dress was hemmed.


Pattern: Colette's Hazel 

Fabric: White cotton eyelet with a mint green cotton underlying (quilting cotton and proud of it), both from Joann Fabric

Size and Modifications: For the bodice I cut a size 2 in width, but cut the length of a size 6 (if that makes sense). I really wanted to avoid the bodice appearing too short. I know that's how the pattern is drafted, and I do have a higher waist, but I didn't want to appear cut off or have the dress be too baby-doll like. I cut a size 6 for the skirt but cut the size 18 length. I needed extra length and know I'd never wear it if it was too short.

Instead of gathers, I went with pleats for the skirt. Since my fabric was a bit stiff, I wanted to cut down on some of the bulk at the waist and figured that pleats would work better.

Hazel Dress Underlining
Mint Green Underlining

Thoughts: I still don't think Colette patterns are quite "me". I love them on people, and I am still going to keep trying, but not sure I'm in love with this. I'm definitely "in like" with it.

See how happy I look?  I wasn't kidding when I said earlier that I had a hard time taking good photos of this. This is probably the best front facing shot of me wearing the finished dress.

Guess I'm just more photogenic from the back :)

I read a lot of reviews about the pointy bust darts and yep, those suckers are pointy! I may have to do some further adjustments here.  I also should have cut a larger size skirt.  This one is my fault. It's not tight, but I don't like the way it puffs so much around my hips.  Not that I am against that, in the right dress, but this one should have been more flowy.

I think if I make this again, and I probably will, I'll add a waist band to further lengthen the bodice. I'm happy with the length, but want more. I'll also either cut a larger size skirt or try using a skirt from a different pattern.

Friday, June 28, 2013

Winter in June

Winter is Coming.

Yes, I am aware of the fact that we've had multiple days of warm, humid, rainy weather in Chicago with no sign that it will drastically cool off anytime soon.  What better time to sew up a pair of winter-themed lounge pants!

Blue Flannel Tofino Lounge Pants

I've actually had the fabric cut out for a few months. I had the privilege of being a Tofino pattern tester earlier this year. At the time I had thoughts of making four of five pairs of Tofinos, but that was before I got sidetracked with life and other projects. This week I needed a break from over thinking my Hazel muslin, and this project fit the bill.


Pattern: Tofino by Sewaholic

Fabric: Blue snowflake flannel from Joann Fabrics, purchased piping, and thick blue knit fabric that I had lying around for the belt.

Construction notes: I cut out a size 8 with no additional modifications. They're lounge pants. I don't need to get fancy with them.

I'm absolutely in love with the piping detail. I think it makes the finished pants look so professional.

Tofino Lounge Pants Piping Detail

On a bittersweet note. I used this same fabric earlier this year to make my grandmother a house dress.  Unfortunately she passed away back in February, shortly after I gave her the dress. I happened upon the same fabric on clearance at Joann Fabrics. It brought back a lot of good memories, and made me remember how much she loved the dress, if only for a short time. I wanted to make a little something for myself out of the same fabric in remembrance, even if it was something as simple as lounge pants.

Thursday, June 20, 2013

Finished Yellow Eyelet Lonsdale

My new camera charger finally arrived! It officially beat the return of my good camera from downstate. And, I was finally able to get my finished Lonsdale photos. (Unfortunately, now my computer with all of my photo editing software is on the fritz, and trying to use Photoshop in safe mode is a pain! Oh well, the show must go on.)

Yellow Eyelet Lonsdale


Yellow Eyelet Lonsdale

Here are the details:

Pattern: Sewaholic's Lonsdale

Fabric: 1 3/8 yards of yellow cotton eyelet from Joann Fabrics. I'm so proud of myself for getting a Lonsdale out of this. The underlining was white mystery fabric from Vogue Fabrics and the lining was combination of assorted white muslin fabrics.

Size and modifications: I cut a size 6 at the top and scaled to an 8 at the waist. I also made a swayback adjustment and pinched the bodice in a bit.   I made these modifications about two years ago when I made my first Lonsdale (back in my pre-blog days), and blindly followed the pattern this time. Luckily, it still fit perfectly!


I did not have enough fabric for the slash pockets. I really love that design feature, but it did need to be sacrificed. Instead I used the Cambie pocket (View B), but any pocket would work.  In hindsight, I should have checked out Sewaholic's tips for using less fabric.  She suggests making facings for the pockets as an alternative, and I probably would have had enough fabric to do that.

Yellow Eyelet Lonsdale

I also had to piece together a few pattern pieces since I was working with so little fabric.  The fashion fabric straps were just too long to layout in one piece, so those are pieced together. The same went for the lining and underlining. I used up a lot of muslin that was lying around, and feel pretty happy with myself for doing that.

Interior of Yellow Eyelet Lonsdale

Finally, I had to shorten the skirt quite a bit in order to get it to fit on the eyelet. I used the View A skirt pieces, and then shortened by another 4 inches.  I'm very happy with the results.  Still long enough to make me feel comfortable, but short enough to feel very summery.

What I learned trying to piece together a pattern with too little fabric:
1. Non-directional prints are your friend. Or, just don't be too picky about matching patterns.
2. Omit or modify pockets.
3. Splice together long pieces. No one will notice and the sewing police won't haul you away.
4. Shorten the skirt.
5. Keep your fingers crossed that the hack job you're about to do actually works.