

I never considered myself a fan of button up shirts. I think it's because they represent a combination of Catholic school repression (part of the uniform) or they're part of the dress code if I have to attend a trade show for work. I've admired them on other people but not something I would often choose to wear.
Enter the BeachComber reversible cotton gauze from Vogue Fabrics. I saw this fabric last year during a Chicago blogger meetup. I gazed at it and debated for a long time before not purchasing any. To me, it screamed to be made into a button up shirt - not my style
About two weeks later I decided I couldn't live without it and went back for some (which it totally my style!)
I sat on it for a while longer before deciding sometime last fall that I would succumb to the Archer pattern from Grainline Studio. I've seen so many cute versions out there and wanted to try it out. I was going to try to make a reversible shirt and use the smaller checks on the outside.
 |
| My original plan. This is also the best representation of the shirt's colors. |
This took a while to make, through no fault of the pattern. I just hit a wall halfway through. The side I was using just looked too "90s" to me and it was driving me nuts! I just didn't like it. I put it away for a while before deciding just to flip it and live with the fact that my buttons would be on the wrong side.
That made all the difference in the world!

I do have to say that for my first successful button up shirt project (there have been a few starts in the past, but nothing that ever made it to the buttonhole stage) - this fabric was a bitch to work with! It's a very loose weave and frays like crazy. I'm lucky that I accidentally sewed the back pleat wrong to begin with, so it's perfect now. I was also attempting flat felled seams (or at least my version of them), but because there's so much fraying I had to go back over and hand reinforce them. Still, it doesn't really bother me and I don't think it's noticeable.
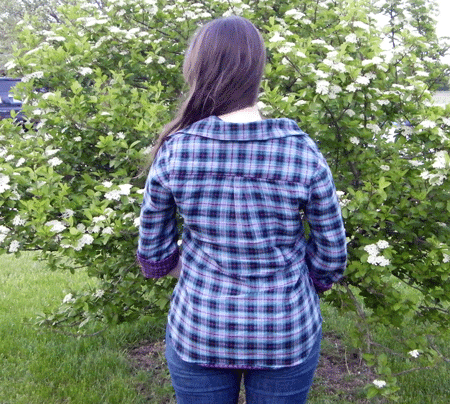
I cut a 6 at the top and graded to an 8 at the waist. Problems aside, I love it. Sure, it could probably use a sway back adjustment (next time-and there will be a next time), the button band isn't perfect because it's technically the inside (but the print hides it, so who cares! And, the inside does look amazing.)
 |
As for the Olney trip, we must of come at the wrong time, because we only saw one of the little guys! Still, it was worth it :)


